Motherboard
The motherboard is the most complex component in the whole computer
(from the user's point of view) becouse everithing connects to it one way
or another and the settings that determine the functionalyty of the
system are made on it.
You need the motherboard manual. If you don't have such documentation
it's imperative to get it. Try to find out the motherboard's manufacturer and model. It is usualy written down in paint somewhere on the printed circuit board with larger fonts. If that doesn't work out, locate two large chips (the chipset) and search in google for " documentation manual guide layout" it should return relevant results. There is no way to guess the functions of jumpers.
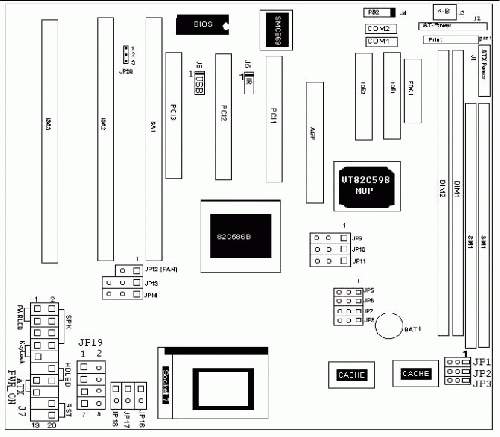
On this specific motherboard, we have:
- theree ISA (Industry Standard Architecture)
96 pin slots. In these you can fit in ISA expansion cards.
- Three PCI (Peripherial Component Interconnect)
slots.
- One AGP (Advanced Graphics Port) slot. Here you
can only mount a AGP Video Card. Note that video cards can be also ISA
and PCI.
- Two IDE (Integrated Drive Electronics) 40 pin disk
drive connectors. Here you connect a HDD's/CD-ROM's data ribbon.
- One FDC (Floppy Drive Connector).
- One AT style keyboard 5 pin connector.
- Two COM (Comunications) connectors. Here you need
ribbons that have an either 9 pin or 25 pin outlets to the back of the
case. These are the serial ports, where you install serial mice or
external modems.
- One PS/2 6 pin connector. Usage is analog to COM,
on this motherboard it's for a PS/2 mouse. Some motherboards (most of
them these days) use this connector type for keyboard too.
- One USB (Universal Serial Bus) connector for USB
mice, scanners, digital cameras, and a variety of other devices.Usage
analog to COM.
- One IR (Infra Red) connector.Never used it, but it
should be analog to COM.
- One LPT (Paralel) connector.Printer port, analog to
COM.
- One AT style power connector. Usualy you get two
connectors at the end of the suply cables. Instalation is with black
wires in the middle. Note that most motherboards have only one power
connector. Even dough this one has two, it is for compatibility with
any poower supy !!not to use two power suplyes!! There is a jumper
to make the selection from.
- One ATX style power connector.
Now that we have gone thru the motherboard connectors, proceed to
make the jumper settings according to your processor specifications;
adjust RAM speed and voltage.
Fitting the motherboard in the case. In theory,
you should now have your motherboard with the CPU, fan and RAM modules
mounted on it plus all the jumper settings made. The trick is that you
fit those first becouse inside the case it's a tight area where you
can't move your hands easily. First remove the tins of the case
(usualy take off the outer screws in the back side). Inside the case
there should be a thin board with some plastic round things to suport
your motherboard. Your skills should get you thru that. Now connect
the AT or ATX suply and leave it like that. Take care of unwanted
cords and plugs, you don't want to have any short circuits. DO
NOT PLUG IT IN!!
<-Back written by Nagy Andrei (27apr2003) www.yioth.3x.ro
Next->